Fuse Sensor Data to Improve Localization (2. Using an external localization system)
이 포스트는 theconstructsim.com의 ROS Navigation in 5 Days 를 참고하였습니다.
이번 포스트에서 다룰 내용은
- 로봇의 위치 추정의 성능을 높이기 위해 robot_localization 패키지를 사용하여 다른 센서들의 데이터들을 병합하는 방법
이번 course에서는 turtlebot simulation package를 사용합니다. 아래 링크를 참조하세요
emanual.robotis.com/docs/en/platform/turtlebot3/simulation/
시뮬레이션 모델은 Waffle 모델을 사용합니다.
waffle 모델을 사용하기 위해서는 환경 변수를 추가하거나, bash shell에 해당 명령을 입력하면 됩니다.
$ export TURTLEBOT3_MODEL=waffle
또는, ~/.bashrc 를 수정하여 맨 밑에 export TURTLEBOT3_MODEL=waffle 를 추가합니다.
사용된 ROS버전은 noetic입니다.
이전 포스트에서 봤던 robot_localization 그래프를 다시 한번 보겠습니다.
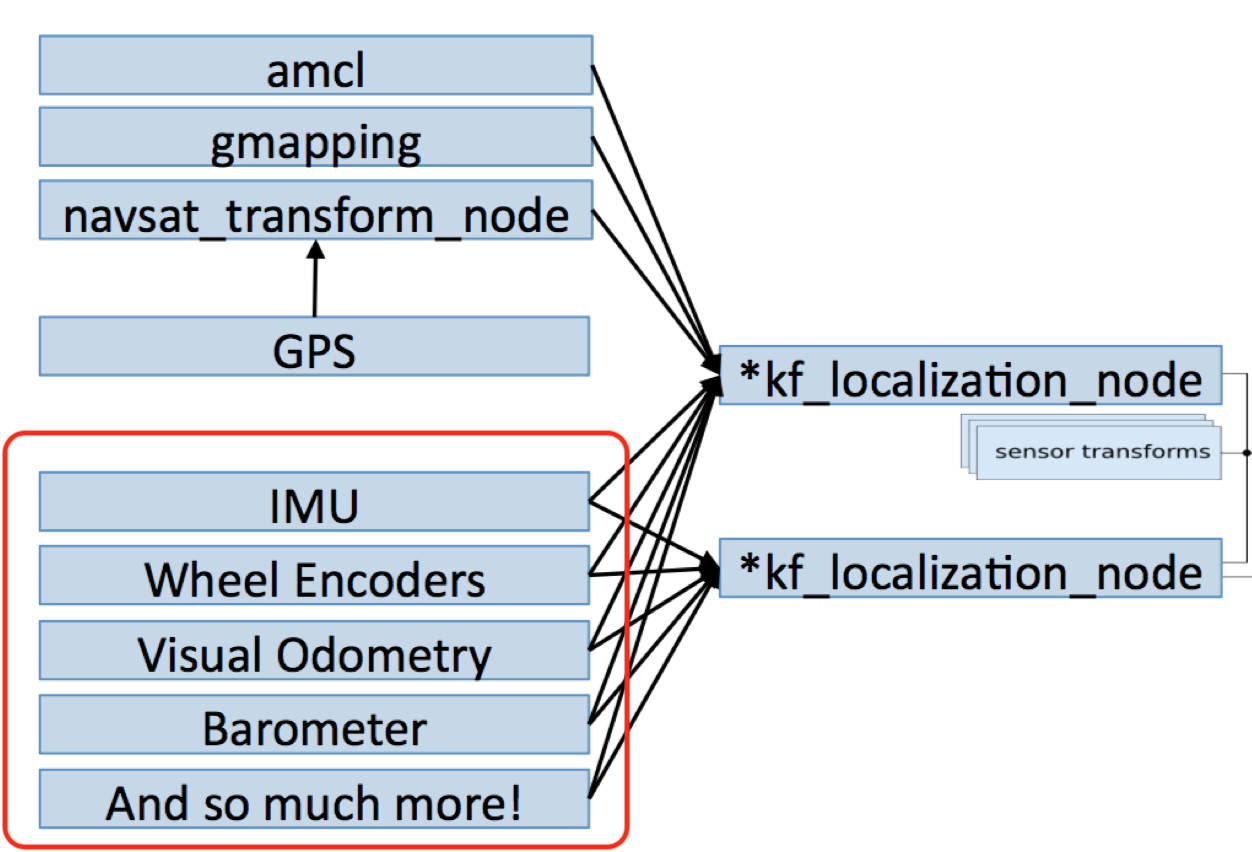
이전 포스트에서는 로봇의 pose estimation을 생성하기 위해 다른 센서 데이터들을 merge하는 방법을 보았습니다. 따라서 기본적으로, 우리는 그래프에서 밑에 있는 부분들, 칼만 필터를 통해 데이터를 merge하기 위해 robot_localization node에 어떤 센서들이 사용되는지를 알아보는 부분 다루었습니다.
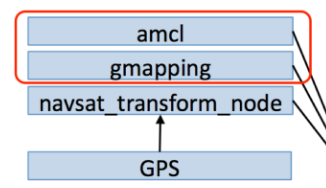
그렇다면, 위쪽 부분에서는 무엇을 할까요? 센서 데이터 말고, 외부의 위치 추정 시스템에서는 어떤 input이 필요할까요?
AMCL
ROS에는 다양한 위치 추정 시스템이 있지만, 가장 많이 알려지고, 가장 많이 사용되는 시스템은 분명히 AMCL입니다. AMCL은 2D환경에서 움직이는 로봇의 위치를 확률적으로 추정하는 시스템입니다. 이 알고리즘은 Adaptive Monte Carlo Localization(AMCL) 접근법을 적용한 것이며, 우리가 알고있는 지도상에서 로봇의 pose를 추적하기 위해 파티클 필터를 사용합니다.
Creating a Map
AMCL을 사용하기 위해 가장 먼저 필요한 것은 로봇이 있는 주변 환경에 대한 지도를 만드는 것입니다. 이를 위해서는, Navigation Stack이 제공하는 slam_gmapping이 필요합니다.
연습 1.
1) 다음 명령으로 새로운 패키지를 만듭니다.
$ roscd; cd src;
$ catkin_create_pkg my_mapping_launcher
2) 그리고, 패키지 안에 launch, config 디렉토리를 생성합니다.
3) launch 디렉토리에 다음과 같이 파일을 만듭니다.
my_gmapping.launch
<launch>
  <!-- Arguments -->
  <arg name="model" default="$(env TURTLEBOT3_MODEL)" doc="model type [burger, waffle, waffle_pi]"/>
  <arg name="configuration_basename" default="turtlebot3_lds_2d.lua"/>
  <arg name="set_base_frame" default="base_footprint"/>
  <arg name="set_odom_frame" default="odom"/>
  <arg name="set_map_frame"  default="map"/>

  <!-- Gmapping -->
  <node pkg="gmapping" type="slam_gmapping" name="turtlebot3_slam_gmapping" output="screen">
    <param name="base_frame" value="$(arg set_base_frame)"/>
    <param name="odom_frame" value="$(arg set_odom_frame)"/>
    <param name="map_frame"  value="$(arg set_map_frame)"/>
    <rosparam command="load" file="$(find my_mapping_launcher)/config/my_params.yaml" />
  </node>
</launch>
my_slam.launch
<launch>
  <!-- Arguments -->
  <arg name="model" default="$(env TURTLEBOT3_MODEL)" doc="model type [burger, waffle, waffle_pi]"/>
  <arg name="slam_methods" default="gmapping" doc="slam type [gmapping, cartographer, hector, karto, frontier_exploration]"/>
  <arg name="configuration_basename" default="turtlebot3_lds_2d.lua"/>
  <arg name="open_rviz" default="true"/>

  <!-- TurtleBot3 -->
  <include file="$(find turtlebot3_bringup)/launch/turtlebot3_remote.launch">
    <arg name="model" value="$(arg model)" />
  </include>

  <!-- SLAM: Gmapping, Cartographer, Hector, Karto, Frontier_exploration, RTAB-Map -->
  <include file="$(find my_mapping_launcher)/launch/my_gmapping.launch">
    <arg name="model" value="$(arg model)"/>
    <arg name="configuration_basename" value="$(arg configuration_basename)"/>
  </include>

  <!-- rviz -->
  <group if="$(arg open_rviz)">
    <node pkg="rviz" type="rviz" name="rviz" required="true"
          args="-d $(find turtlebot3_slam)/rviz/turtlebot3_$(arg slam_methods).rviz"/>
  </group>
</launch>
4) config 디렉토리에 다음과 같이 파일을 만듭니다.
my_params.yaml
map_update_interval: 2.0
maxUrange: 3.0
sigma: 0.05
kernelSize: 1
lstep: 0.05
astep: 0.05
iterations: 5
lsigma: 0.075
ogain: 3.0
lskip: 0
minimumScore: 50
srr: 0.1
srt: 0.2
str: 0.1
stt: 0.2
linearUpdate: 1.0
angularUpdate: 0.2
temporalUpdate: 0.5
resampleThreshold: 0.5
particles: 100
xmin: -10.0
ymin: -10.0
xmax: 10.0
ymax: 10.0
delta: 0.05
llsamplerange: 0.01
llsamplestep: 0.01
lasamplerange: 0.005
lasamplestep: 0.005
turtlebot3_lds_2d.lua
include "map_builder.lua"
include "trajectory_builder.lua"

options = {
  map_builder = MAP_BUILDER,
  trajectory_builder = TRAJECTORY_BUILDER,
  map_frame = "map",
  tracking_frame = "imu_link", -- imu_link, If you are using gazebo, use 'base_footprint' (libgazebo_ros_imu's bug)
  published_frame = "odom",
  odom_frame = "odom",
  provide_odom_frame = false,
  publish_frame_projected_to_2d = false,
  use_odometry = true,
  use_nav_sat = false,
  use_landmarks = false,
  num_laser_scans = 1,
  num_multi_echo_laser_scans = 0,
  num_subdivisions_per_laser_scan = 1,
  num_point_clouds = 0,
  lookup_transform_timeout_sec = 0.2,
  submap_publish_period_sec = 0.3,
  pose_publish_period_sec = 5e-3,
  trajectory_publish_period_sec = 30e-3,
  rangefinder_sampling_ratio = 1.,
  odometry_sampling_ratio = 0.1,
  fixed_frame_pose_sampling_ratio = 1.,
  imu_sampling_ratio = 0.1,
  landmarks_sampling_ratio = 1.,
}

MAP_BUILDER.use_trajectory_builder_2d = true

TRAJECTORY_BUILDER_2D.min_range = 0.1
TRAJECTORY_BUILDER_2D.max_range = 3.5
TRAJECTORY_BUILDER_2D.missing_data_ray_length = 3.
TRAJECTORY_BUILDER_2D.use_imu_data = true
TRAJECTORY_BUILDER_2D.use_online_correlative_scan_matching = true
TRAJECTORY_BUILDER_2D.motion_filter.max_angle_radians = math.rad(0.1)

POSE_GRAPH.constraint_builder.min_score = 0.65
POSE_GRAPH.constraint_builder.global_localization_min_score = 0.7

return options
5) 다음 명령으로 필요한 node를 실행하여 지도를 만들어봅니다.
$ roslaunch turtlebot3_gazebo turtlebot3_house.launch
$ roslaunch my_mapping_launcher my_slam.launch
$ roslaunch turtlebot3_teleop turtlebot3_teleop_key.launch

6) turtlebot3_teleop node를 사용하여 로봇을 움직여 지도를 완성합니다.

7) 다음 명령으로 지도를 저장합니다. 저장 위치는 현재 디렉토리입니다.
$ rosrun map_server map_saver -f name_of_map
연습 1. 끝
Localize the robot
지도를 만든 후에, 로봇의 위치를 찾기 위해서는 Navigation Stack에서 제공하는 amcl node를 사용할 것입니다.
연습 2.
1) 다음 명령으로 패키지를 만듭니다.
$ catkin_create_pkg my_amcl_launcher
2) launch, maps 디렉토리를 만듭니다.
3) maps 디렉토리에 연습 2.에서 저장했던 지도를 복사하거나, 옮깁니다. map.pgm, map.yaml 모두 옮겨야 합니다.
4) 다음과 같이 파일을 생성합니다.
my_amcl.launch
<launch>

  <!-- Map server -->
  <arg name="map_file" default="$(find my_amcl_launcher)/maps/map.yaml"/>
  <node pkg="map_server" name="map_server" type="map_server" args="$(arg map_file)"/>

  <!-- Arguments -->
  <arg name="scan_topic"     default="scan"/>
  <arg name="initial_pose_x" default="0.0"/>
  <arg name="initial_pose_y" default="0.0"/>
  <arg name="initial_pose_a" default="0.0"/>

  <!-- AMCL -->
  <node pkg="amcl" type="amcl" name="amcl">
    <remap from="odom" to="/odom" />
    <param name="base_frame_id" value="base_footprint"/>

    <param name="min_particles"             value="100"/>
    <param name="max_particles"             value="5000"/>
    <param name="kld_err"                   value="0.02"/>
    <param name="update_min_d"              value="0.20"/>
    <param name="update_min_a"              value="0.20"/>
    <param name="resample_interval"         value="1"/>
    <param name="transform_tolerance"       value="0.5"/>
    <param name="recovery_alpha_slow"       value="0.00"/>
    <param name="recovery_alpha_fast"       value="0.00"/>
    <param name="initial_pose_x"            value="$(arg initial_pose_x)"/>
    <param name="initial_pose_y"            value="$(arg initial_pose_y)"/>
    <param name="initial_pose_a"            value="$(arg initial_pose_a)"/>
    <param name="gui_publish_rate"          value="50.0"/>

    <remap from="scan"                      to="$(arg scan_topic)"/>
    <param name="laser_max_range"           value="3.5"/>
    <param name="laser_max_beams"           value="180"/>
    <param name="laser_z_hit"               value="0.5"/>
    <param name="laser_z_short"             value="0.05"/>
    <param name="laser_z_max"               value="0.05"/>
    <param name="laser_z_rand"              value="0.5"/>
    <param name="laser_sigma_hit"           value="0.2"/>
    <param name="laser_lambda_short"        value="0.1"/>
    <param name="laser_likelihood_max_dist" value="2.0"/>
    <param name="laser_model_type"          value="likelihood_field"/>

    <param name="odom_model_type"           value="diff"/>
    <param name="odom_alpha1"               value="0.1"/>
    <param name="odom_alpha2"               value="0.1"/>
    <param name="odom_alpha3"               value="0.1"/>
    <param name="odom_alpha4"               value="0.1"/>
    <param name="odom_frame_id"             value="odom"/>
    <param name="base_frame_id"             value="base_footprint"/>

  </node>
</launch>
5) 다음 명령을 실행하여 AMCL 결과를 확인해봅니다. 시각화를 위해 필요한 데이터는 RViz에서 추가합니다.
$ roslaunch turtlebot3_gazebo turtlebot3_house.launch
$ roslaunch my_amcl_launcher my_amcl.launch
$ rosrun robot_state_publisher robot_state_publisher
$ rviz

6) 현재 위치가 맞지 않으므로, 2D Pose Estimate 를 사용하여 초기 위치를 수정합니다

7) turtlebot3_teleop를 사용하여 로봇을 움직이고, 자신의 위치를 찾아가는 모습을 확인합니다.
$ roslaunch turtlebot3_teleop turtlebot3_teleop_key.launch

연습 2. 끝
Merging AMCL with robot_localization
이번엔 여러 센서의 데이터를 merge 해보겠습니다.
연습 3.
1) 다음 명령으로 패키지를 만듭니다.
$ catkin_create_pkg tutlebot3_localization
2) launch, config 디렉토리를 생성하고, 다음과 같이 launch 파일을 만듭니다.
start_ekf_localization.launch
<launch>

    <!-- Run the EKF Localization node -->
    <node pkg="robot_localization" type="ekf_localization_node" name="ekf_localization">
        <rosparam command="load" file="$(find turtlebot_localization)/config/ekf_localization.yaml"/>
    </node>

</launch>
3) config 디렉토리에 다음과 같이 파일을 만듭니다. noisy를 추가한 데이터를 받아서 위치추정을 할 것이므로, topic을 noisy_odom, noisy_imu로 설정합니다.
ekf_localization.yaml
#Configuation for robot odometry EKF
frequency: 50
two_d_mode: true
publish_tf: false
# Complete the frames section
odom_frame: noisy_odom
base_link_frame: base_link
world_frame: map
map_frame: map
# Complete the odom0 configuration
odom0: odom
odom0_config: [false, false, false,
false, false, false,
true, true, false,
false, false, true,
false, false, false]
odom0_differential: false
# Complete the imu0 configuration
imu0: noisy_imu
imu0_config: [false, false, false,
false, false, true,
false, false, false,
false, false, true,
true, false, false]
imu0_differential: false
# The process noise covariance matrix can be difficult to tune, and can vary for each application, so it
# is exposed as a configuration parameter. The values are ordered as x, y, z, roll, pitch, yaw, vx, vy, vz,
# vroll, vpitch, vyaw, ax, ay, az. Defaults to the matrix below if unspecified.
process_noise_covariance: [0.05, 0, 0, 0, 0, 0, 0, 0, 0, 0, 0, 0, 0, 0, 0,
0, 0.05, 0, 0, 0, 0, 0, 0, 0, 0, 0, 0, 0, 0, 0,
0, 0, 0.06, 0, 0, 0, 0, 0, 0, 0, 0, 0, 0, 0, 0,
0, 0, 0, 0.03, 0, 0, 0, 0, 0, 0, 0, 0, 0, 0, 0,
0, 0, 0, 0, 0.03, 0, 0, 0, 0, 0, 0, 0, 0, 0, 0,
0, 0, 0, 0, 0, 0.06, 0, 0, 0, 0, 0, 0, 0, 0, 0,
0, 0, 0, 0, 0, 0, 0.025, 0, 0, 0, 0, 0, 0, 0, 0,
0, 0, 0, 0, 0, 0, 0, 0.025, 0, 0, 0, 0, 0, 0, 0,
0, 0, 0, 0, 0, 0, 0, 0, 0.04, 0, 0, 0, 0, 0, 0,
0, 0, 0, 0, 0, 0, 0, 0, 0, 0.01, 0, 0, 0, 0, 0,
0, 0, 0, 0, 0, 0, 0, 0, 0, 0, 0.01, 0, 0, 0, 0,
0, 0, 0, 0, 0, 0, 0, 0, 0, 0, 0, 0.02, 0, 0, 0,
0, 0, 0, 0, 0, 0, 0, 0, 0, 0, 0, 0, 0.01, 0, 0,
0, 0, 0, 0, 0, 0, 0, 0, 0, 0, 0, 0, 0, 0.01, 0,
0, 0, 0, 0, 0, 0, 0, 0, 0, 0, 0, 0, 0, 0, 0.015]
# This represents the initial value for the state estimate error covariance matrix. Setting a diagonal value (a
# variance) to a large value will result in early measurements for that variable being accepted quickly. Users should
# take care not to use large values for variables that will not be measured directly. The values are ordered as x, y,
# z, roll, pitch, yaw, vx, vy, vz, vroll, vpitch, vyaw, ax, ay, az. Defaults to the matrix below if unspecified. -->
initial_estimate_covariance: [1e-2, 0, 0, 0, 0, 0, 0, 0, 0, 0, 0, 0, 0, 0, 0,
0, 1e-2, 0, 0, 0, 0, 0, 0, 0, 0, 0, 0, 0, 0, 0,
0, 0, 1e-2, 0, 0, 0, 0, 0, 0, 0, 0, 0, 0, 0, 0,
0, 0, 0, 1e-2, 0, 0, 0, 0, 0, 0, 0, 0, 0, 0, 0,
0, 0, 0, 0, 1e-2, 0, 0, 0, 0, 0, 0, 0, 0, 0, 0,
0, 0, 0, 0, 0, 1e-2, 0, 0, 0, 0, 0, 0, 0, 0, 0,
0, 0, 0, 0, 0, 0, 1e-2, 0, 0, 0, 0, 0, 0, 0, 0,
0, 0, 0, 0, 0, 0, 0, 1e-2, 0, 0, 0, 0, 0, 0, 0,
0, 0, 0, 0, 0, 0, 0, 0, 1e-2, 0, 0, 0, 0, 0, 0,
0, 0, 0, 0, 0, 0, 0, 0, 0, 1e-2, 0, 0, 0, 0, 0,
0, 0, 0, 0, 0, 0, 0, 0, 0, 0, 1e-2, 0, 0, 0, 0,
0, 0, 0, 0, 0, 0, 0, 0, 0, 0, 0, 1e-2, 0, 0, 0,
0, 0, 0, 0, 0, 0, 0, 0, 0, 0, 0, 0, 1e-2, 0, 0,
0, 0, 0, 0, 0, 0, 0, 0, 0, 0, 0, 0, 0, 1e-2, 0,
0, 0, 0, 0, 0, 0, 0, 0, 0, 0, 0, 0, 0, 0, 1e-2]
4) ekf_localization node는 /odometry/filtered 라는 topic으로 필터링 된 오도메트리를 publish합니다. 필터링 된 오도메트리 데이터가 엔코더만 사용한 오도메트리보다 신뢰도가 높기 때문에, 이를 사용하기 위해서는 이전에 연습 2.에서 만들었던 amcl 관련 파라미터에서 해당 topic을 사용하도록 설정해줘야 합니다.
my_amcl.launch 파일 일부를 다음과 같이 수정합니다.

5) 다음과 같이 launch 파일을 만듭니다.
<launch>

    <arg name="open_rviz" default="true"/>

    <!-- Start AMCL Localization node -->
    <include file="$(find my_amcl_launcher)/launch/my_amcl.launch" />

    <!-- Start AMCL Localization node -->
    <include file="$(find turtlebot_localization)/launch/start_ekf_localization.launch" />

</launch>
6) script 디렉토리를 생성하고, 다음과 같이 파이썬 코드를 작성합니다.
init_pose.py
#!/usr/bin/env python3

import rospy
from geometry_msgs.msg import PoseWithCovarianceStamped
from robot_localization.srv import SetPose

def callback(msg):
    init_pose = SetPose()
    init_pose.pose = msg
    print(init_pose.pose)
    initialize_service(init_pose.pose)


rospy.init_node('pose_initializer', anonymous=True)

sub = rospy.Subscriber('initialpose', PoseWithCovarianceStamped,callback)
rospy.wait_for_service('/set_pose')

initialize_service = rospy.ServiceProxy('/set_pose', SetPose)


rospy.spin()
robot_localization 패키지는 로봇의 위치를 초기화 할 때, /set_pose 라는 service를 받고, 그 값으로 초기화합니다.
RViz에서 2D Pose Estimate를 통해 위치를 초기화하면, RViz는 /initialpose topic으로 초기 위치를 publish하고, amcl node에서 이 값을 받아 위치를 초기화 하는데, 이러면 필터링 된 오도메트리의 좌표는 초기화되지 않고, 기존의 오도메트리만을 초기화하게 됩니다.
위 파이썬 코드는 /initialpose topic을 받고, 그 데이터를 기반으로 /set_pose service를 호출하는 코드입니다.
7) 센서 데이터에 노이즈를 추가하기 위해, 다음과 같이 코드를 작성합니다
noisy_data.py
#!/usr/bin/env python3
import rospy
from nav_msgs.msg import Odometry
from sensor_msgs.msg import Imu
import random

class NoisyOdom():

    def __init__(self):
        self.odom_subscriber = rospy.Subscriber('/odom', Odometry, self.odom_callback)
        self.imu_subscriber = rospy.Subscriber('/imu', Imu, self.imu_callback)

        self.odom_publisher = rospy.Publisher('/noisy_odom', Odometry, queue_size=1)
        self.imu_publisher = rospy.Publisher('/noisy_imu', Imu, queue_size=1)

        self.odom_msg = Odometry()
        self.imu_msg = Imu()

        self.ctrl_c = False
        rospy.on_shutdown(self.shutdownhook)
        self.rate = rospy.Rate(5)

    def shutdownhook(self):
        # works better than the rospy.is_shut_down()
        self.ctrl_c = True

    def odom_callback(self, msg):

        # save the odometry message and call add_noise() function
        self.odom_msg = msg
        self.add_odom_noise()

    def imu_callback(self, msg):
        self.imu_msg = msg
        self.add_imu_noise()

    def add_odom_noise(self):

        # add noise to the Y position value of the odometry message
        rand_float = random.uniform(-0.3,0.3)
        rand_float2 = random.uniform(-0.3,0.3)
        self.odom_msg.pose.pose.position.y = self.odom_msg.pose.pose.position.y + rand_float
        self.odom_msg.pose.pose.position.x = self.odom_msg.pose.pose.position.x + rand_float2

    def add_imu_noise(self):

        # add noise to the Y position value of the odometry message
        rand_float = random.uniform(-0.1,0.1)
        rand_float2 = random.uniform(-0.1,0.1)
        rand_float3 = random.uniform(-0.1,0.1)
        self.imu_msg.linear_acceleration.x = self.imu_msg.linear_acceleration.x + rand_float
        self.imu_msg.linear_acceleration.y = self.imu_msg.linear_acceleration.y + rand_float2
        self.imu_msg.linear_acceleration.z = self.imu_msg.linear_acceleration.z + rand_float3

    def publish_noisy_data(self):

        # loop to publish the noisy odometry values
        while not rospy.is_shutdown():
            self.imu_publisher.publish(self.imu_msg)
            self.odom_publisher.publish(self.odom_msg)

            self.rate.sleep()

if __name__ == '__main__':
    rospy.init_node('noisy_odom_node', anonymous=True)
    noisyodom_object = NoisyOdom()
    try:
        noisyodom_object.publish_noisy_data()
    except rospy.ROSInterruptException:
        pass
8) 결과를 확인하기 위해, node들을 실행해봅니다.
$ roslaunch turtlebot3_gazebo turtlebot3_house.launch
$ roslaunch turtlebot_localization global_localization.launch
$ rosrun robot_state_publisher robot_state_publisher
$ rosrun turtlebot_localization init_pose.py
$ rosrun turtlebot_localization noisy_data.py
$ roslaunch turtlebot3_teleop turtlebot3_teleop_key.launch

빨간색이 로봇의 실제 오도메트리, 노란색은 노이즈가 추가된 오도메트리, 파란색이 필터링 된 오도메트리 입니다.